Unlike many other applications, Okta doesn’t have a ready-made SAML integration for Akamai for SSO, and getting it to work requires another step in Okta’s API.
Allow us save you a few hours with this step-by-step guide. You’re welcome!
Book a demo today to see GlobalDots is action.
Optimize cloud costs, control spend, and automate for deeper insights and efficiency.

These are the steps needed in Okta’s UI:
1. Create a new SAML2.0 app in Okta
2. Give it a name and a logo and continue to Configure SAML
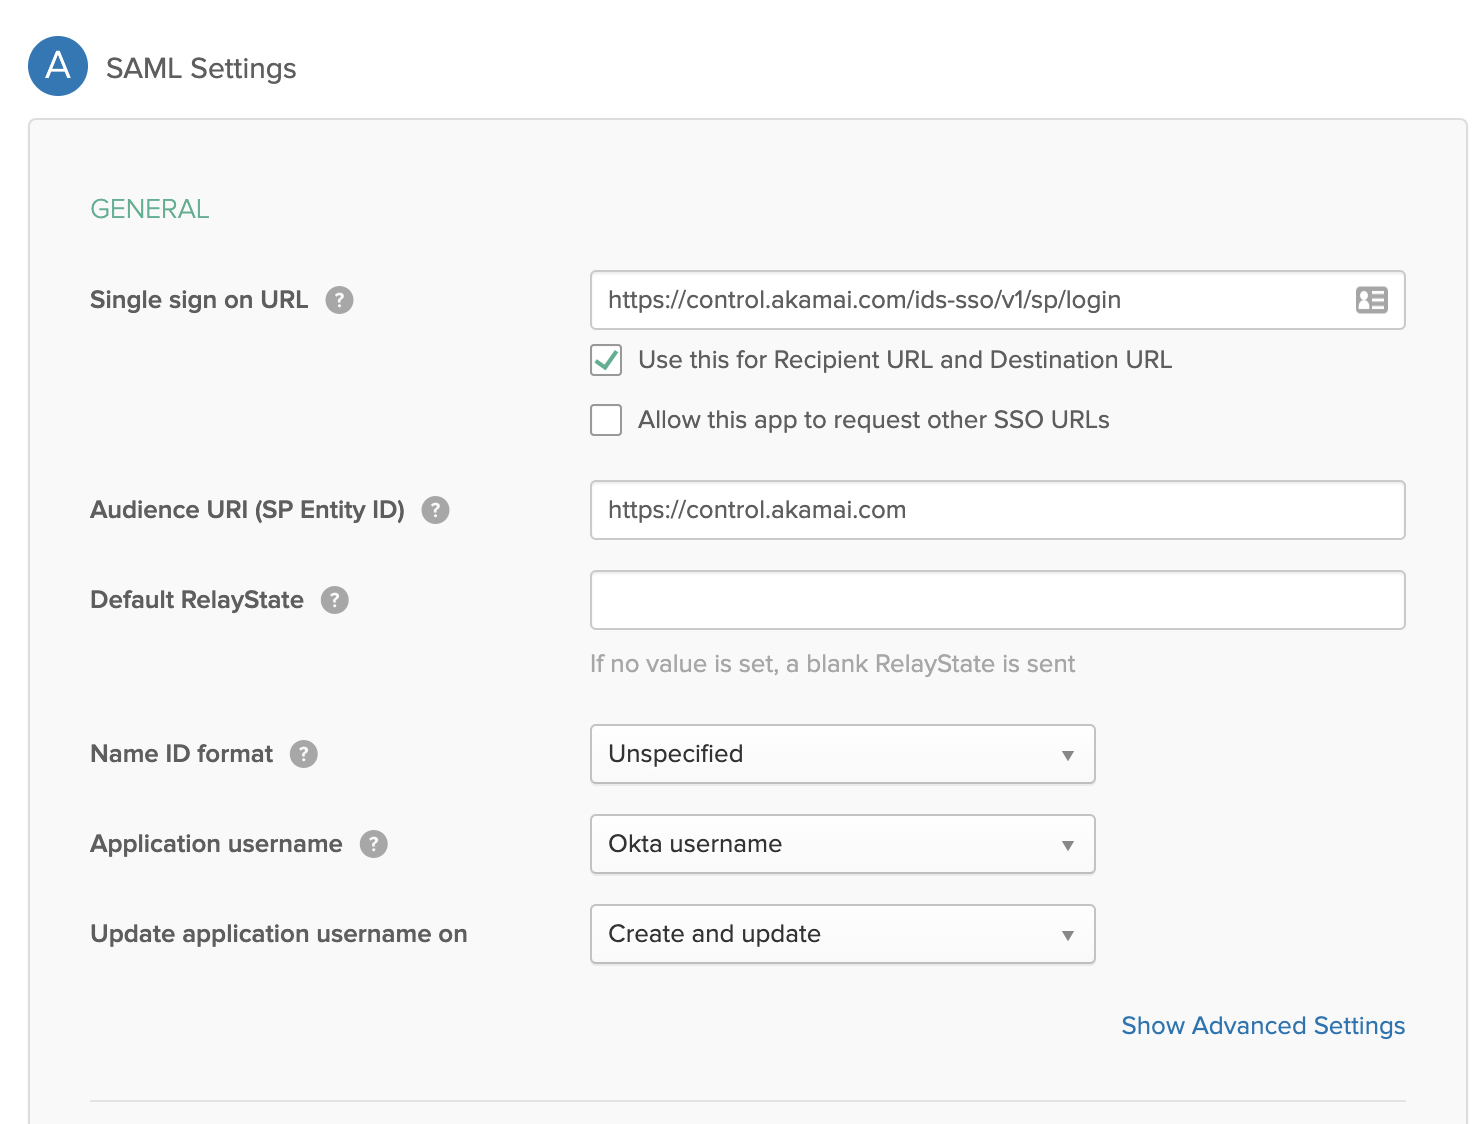
3. Fill the following:
- Single sign on URL is https://control.akamai.com/ids-sso/v1/sp/login
- Audience URI is https://control.akamai.com
Continue, provide Okta feedback (optional) and Finish and we’re ready to move on to the fun part.
Steps needed in Okta’s APIs:
Okta’s certificates are valid for 10 years by default. Akamai doesn’t trust certificates who’s expiry date is over 5 years. Something needs to be done! This tutorial uses Postman, so if you want to follow it, download and install Postman and Okta’s Apps postman collection https://app.getpostman.com/run-collection/4857222012c11cf5e8cd
I’ll also provide quick and dirty curl commands
- Create an API token in Okta (security -> API -> Create Token) and save it somewhere safe
- Go to the newly created application, and from the url copy the part after /instance/ and before /# and save it somewhere safe. This is your application id
- If you’re using postman, add/update your environment variables to match the following:
a. url with your Okta domain (in my case – globaldots.okta.com)
b. appId with your application ID
c. Apikey with your api token - Select “Certificate Operations” and “Generate Certificate” – PREPEND HTTPS TO THE REQUEST, change validity Years parameter to 5 (Akamai’s max) and hit Send.
a. Curl alternative for the lazy – replace okta Domain with your domain, appid with appid, API key with API keycurl -X POST
'https://{{oktaDomain}}/api/v1/apps/{{appId}}/credentials/keys/generate?validityYears=5'
-H 'Accept: application/json'
-H 'Accept-Encoding: gzip, deflate'
-H 'Authorization: SSWS {{APIKEY}}'
-H 'Cache-Control: no-cache'
-H 'Connection: keep-alive'
-H 'Content-Length: 0'
-H 'Content-Type: application/json'
-H 'Host: {{oktaDomain}}'
-H 'User-Agent: PostmanRuntime/7.19.0'
-H 'cache-control: no-cache' - From the response, grab the key id (kid) and save it somewhere
- Send another API call to get the full app details and note the app name, label and SignOnMode parameters. In Postman select “Get App” and in curl use:
curl -X GET
 https://{{oktatenant}}/api/v1/apps/{{appId}}
 -H 'Accept: application/json'
 -H 'Accept-Encoding: gzip, deflate'
 -H 'Authorization: SSWS {{API token}}'
 -H 'Cache-Control: no-cache'
 -H 'Connection: keep-alive'
 -H 'Content-Type: application/json'
 -H 'Cookie: JSESSIONID=D0C79026910B893FA804BA0A6868E373'
 -H 'Referer: http://{{oktatenant}}/api/v1/apps/{{appId}}'
-H 'cache-control: no-cache’ --compressed - To update the certificate we just created, use “Update Application Certificate” in postman, navigate to the “Body” tab and replace {{keyId}} with the kid you got on stage 4. Again prepend with HTTPS, fill in the rest of the application details
curl -v -X PUT
 -H "Accept: application/json"
 -H "Content-Type: application/json"
 -H "Authorization: SSWS ${api_token}"
 -d '{
 "name": “{{appname}}",
 "label": “{{label}}",
 "signOnMode": "SAML_2_0",
 "credentials": {
 "signing": {
 "kid": “${kid}"
 }
 }
 }' "https://${yourOktaDomain}/api/v1/apps/${aid}”
Go back to Okta’s UI, open your newly created app, and copy the Identity provider metadata URL to your clipboard
- Open Akamai’s Control Panel and navigate to Identity -> manage sso
- Create a new configuration and paste the metadata URL under “Load metadata from a URL”
Done! By default SSO is enabled but not enforced, so on sign in you can decide how you want to log in. You can force SSO if you want to.